About Technology Tricks, here you can find tricks related to Computer Software, Mobile Applications and many more tricks and information related to technology.

Monday, 26 October 2015


For Android users we are here with How to Save a Number During a Phone Call on Your Android. When you are on call and any of on the call ask to save any number then what you do, you start searching for paper and pen to write the number. This is because while on the call you can only dial nay number on dialpad but it get vanishes when your end the call. So to overcome this we are here with a cool solution that will allow your to save any contact in your android device while you are even on call. So have a look on complete guide discussed below to proceed.

How to Save a Number During A Phone Call On Android

The method is very simple and depends on a cool android app that will let your to save any of  contact in your android device when you are on a call. You will just need on the icon that will appear in your call screen to save the number. So proceed with the below steps.

Features Of Call Writer Android App

  • Enable speaker mode in your android when you click on icon.
  • Saved Notes will automatically get saved when call is ended.
  • Either you can use notepad or paint in it.
  • Multi designs notes saving option.

Steps To Setup App To Save a Number During a Phone Call on Your Android

  1. First of all in your android device download and install a cool app that is Call Writer.
  2. Open the app after installing and you will see screen like below.
  3. Now tap on three lined sign button and in settings you can customize according to your wish.call writer2
  4. Now whenever you make any call or receive any then you will see a dialer like blue icon. Just you have to tap on it and save anything that you want to save.call writer3
  5. The written note will get automatic save when call ends up.
  6. Thats it you are done, now there will be no need of any paper and pen, just a app is enough to save your things on ongoing calls.
So use the method and get up from the tension to find out pen and paper to note down important things on ongoing calls.
Also Read:
So above is all about How to Save a Number During a Phone Call on Your Android. With this method you can easily save contacts while you are on call and there will be no need to search for pen and paper and then write the number and after call dial it and then save it.

Sunday, 18 October 2015


In these days android is most used operating system and everyone use android phones. Android operating system is provided by Google. Android phones is very popular in these days. There is many ways to give security to yous phones with some apps you can use inbuilt unlock pattern or unlock codes for easy security you can also download some unlock codes app from play store easily and many users use different types of applications in android phone.

Suddenly if you forget your android lock pattern, don’t worry, have a very simple method to unlock or reset the android lock pattern. Some peoples uses android lock pattern and many peoples often forget their lock pattern.

How To Unlock Android Pattern Lock


Steps To Unlock Android  Phone Pattern 2015 :-

Just follow these simple steps to unlock your android phone pattern 2015 ,
To get your pattern lock or password of your android device unlocked please follow the instructions well and am sure you will get what you are going to get your device unlocked without problem.
  1. First of all, you need to switch off your android phone and keep it for some time 1-2 min.
  2. After switching of your android device, press your up volume button and Press It down.
  3. Now press the power button and hold it too along with the volume up button.
  4. It will start a secret terminal interface (Recovery mode).
  5. Then press to use home button for scroll volume up and down or swipe up and down.
  6. Then you will get to the choose option Delete All User Data.
  7. Now in this way, your android lock pattern is unlocked now problem is solved.
Your device will take some time but after it will restart and you will find out your android device has been unlocked and all apps and user data will be formatted so try only if you forget your android’s pattern or any lock.

Tuesday, 13 October 2015


Today we are here with How To Restore Deleted Text Messages On Android. Android is one of the most popular OS in the world of smartphone. Now while restoring or formatting your android device your text messages get deleted. And sometime you loss some critical information that you stored in your text messages. So here is the way by which you can recover your deleted messages in your Android. So have a look on complete guide below to proceed.

How To Restore Deleted Text Messages On Android

The method is very simple and depends on a cool recovery trick of your android that will help you to get back your deleted text messages easily. Just follow up the steps below to proceed.

Steps To Recover Deleted Text Messages On Android

  1. First of all in your windows PC download and install the tool Android Data Recovery.
  2. Now after installing it launch in your Pc.
  3. Now you have to enable USB debugging in your android for that you have to go toSettings -> About Phone -> Build Number and tap on it 7-10 times.
  4. Now you will see developer option in your settings and tap on it and scroll down and enable USB Debugging.usb debugging
  5. Now launch the tool that you installed in your Pc and there select your android version and proceed by connecting your android to your PC via USB cable. android data recovery
  6. Now select the messages at the recovery section and then simply click on next.android data recovery2
  7. Thats it you are done, now the restoring process will begin and all your messages will get recover.

Method To Never Lose Text Messages Again

Here we will be discussing an app that will backup your current messages in your android device and if you lots your messages in future then this app will restore them for you.
  1. First of all in your android download the app SMS Backup & Restore.
  2. Now simply click on backup and there select type of backup that is All conversation and from bottom select Local Backup And Upload.sms-backup-restore
  3. Now backup process will start and your messages will get backup.
  4. Now whenever you lost your text messages simply restore them from this app.sms-backup-restore2
So above is all about How To Restore Deleted Text Messages On Android. Using this method you can easily recover up your deleted text messages and all other data that you have lost in your android.
I hope you enjoyed this tutorial , If you have any query regarding this tutorial please mail us or comment us.
Thanks
Keep Visiting Keep Learning.

Monday, 5 October 2015


How To USe Multiple Whatsapp Account Android – Whatsapp is the most popular messaging app.Now this app is very much viral in all over the world and become one of the favorite app of all the user. This app allows to send messages ,images ,videos,locations for free which make it one of the best android app 2015. Now lets talk about multiple whatsapp account.Your android supports only one whatsapp account at a time . But you can run two or more whatsapp account in your android. The method is very easy for that you just have to follow some simple steps to do so that have discuused below.

How To Use Multiple Whatsapp Account In Android

There are basicall two methods to run multiple whatsapp account . One is with a rooted android and onther can work without rooted android.

#1 Method: Multiple Whatspp account Using OGWhatsapp

OGWhatsapp is an android app which lets you yo run two whatsapp account in your android .One account on the default whatsapp app and other on this app.Just follow the below steps to proceed.
  1. First of all take the full backup for your messages and data of your whatsapp.
  2. Now goto Settings->apps->whatsapp->Clear Data.
  3. Now Go to /sdcard/WhatsApp folder and rename it to /sdcard/OGWhatsApp.
  4. Now uninstall the ofiicial whatsapp from your android.
  5. Now download OGWhatsapp in your android from here.
  6. OgWhatsapp  will ask for your mobile number. Give the old number which you have installed in official Whatsapp earlier in it.
  7. OGWhatsapp id now ready with your old number.
  8. Now download and install official Whatapp .
  9. Put the another mobile number for verification in it.
Thats it you are done .Now you wil be having two whatsapp account in a single android device.

#2 Method : Using Switchme App

This method wll work only in rooted android, follow the below steps to procees :-
  1. First of all root your android.
  2. Now install switchme app.
  3. Now create a new user account in the app. These account will help you to switch between multiple user account in your android.
  4. Now loggin into your secondary account. There you will see no third party app install.
  5. Now install whatsapp there and verify your second mobile number there.
  6. Now the second mobile number will we working there and first no. will be working in the primary account.
  7. Again go to switch me app and goto your primary account and there will be the old whatsapp there.
Thats it by this way you can switch between both the accounts and can use multiple whatspp there.
So above are the methods for How To Run Multiple Whatsapp Account In Android. By these simple method you ca easily run multiple whatsapp account in your android and can have fun over using both sim for messaging your friends.
I hope you enjoyed this tutorial , If you have any query regarding this tutorial please mail us or comment us.
Thanks
Keep Visiting Keep Learning.

Saturday, 3 October 2015


For Smartphone and PC user we are here with a cool trick for How To Remotely Shutdown PC From Anywhere With Smartphone. Today your smartphone are really smart and can be used for lots of purpose in this tech world. Till now we had discussed so many cool tricks for smartphones and we are again here with a cool method to shutdown your windows PC using phone. Yes it is possible you can implement this and can remotely shutdown your PC with your mobile from anywhere by just sending a shutdown request to your computer over internet. So have a look on complete guide below.

How To Remotely Shutdown Windows PC From Anywhere Using Phone

The method is based on a cool windows program that is mainly designed to schedule shutdown on your PC but it can be used as remotely shutdown program too using some settings and implementations that we have discussed below, so proceed with below steps.

Steps To Shutdown PC With Smartphone Remotely:

  1. First of in your windows PC download and install the program Airytec switch off.
  2. Now install the app and you will see shutdown icon in system tray.
  3. Click on the icon and tick the options there according to your need like Force shutdown should be enabled.1
  4. Now right click on shutdown icon and click on setting and there click on remote section there.2
  5. Now click on Edit Webinterface Settings there.
  6. There enable Webinterface and remain the Authentication unchecked and click on apply button.3
  7. Now click on view / update static addresses and note down the Shutdown URL  there and for easy4interface you can bookmark this URL in Your Mobile.5
  8. Now double click on shutdown icon in system tray and enable task.
  9. Now open the URL in your mobile and you will see interface like below.7
  10. Now click on shutdown button to shut your computer and process will start.
  11. Thats it you are done, using this now you can easily shutdown your computer from any where using your phone.
So this is all about How To Remotely Shutdown PC From Anywhere With Smartphone. With the cool method discussed above you can easily shutdown your computer any where from your smartphone or any web enabled device. Hope you like the article, do share with others too.
I hope you enjoyed this tutorial , If you have any query regarding this tutorial please mail us or comment us.
Thanks
Keep Visiting Keep Learning.

Thursday, 1 October 2015

For android users we are here with How To Backup & Restore IMEI in Android. Android is a very smart device on which we always keep on trying new things like new apps and tweaks. And the best thing you can do with your android is rooting. But with the risk of loss of warrant there is always a risk of loss of IMEI number too. As while flashing out custom rom in your android IMEI file in your android gets corrupted and your device will not get any cellular range. So we are here with a cool method by which you can easily backup and restore your android IMEI number easily. So have a look on complete guide discussed below.

How To Backup & Restore IMEI in Android

The method is very simple and just depends on a cool app that will help you to backup and restore your IMEI file in your android. So follow up the below steps to proceed.

Steps To Easily Backup & Restore IMEI File in Android

  1. First of all you need to root your android device and for complete guide for rooting visit here.
  2. Now after rooting android download and install the app given below:
    Samsung users download: EFS☆IMEI☆Backup      Other Android Users download: Mobileuncle MTK Tools.
  3. Now launch the apps in your respective android and grant the app superuser access.                                 imei backup and restore 1
  4. Now in the EFS app select RAW partition image and then tap on save EFS (IMEI) backup, and in Mobile Uncle App simply click on Backup To Sd card.                                                            imei backup and restore 2
  5. Now in your respective devices copy the IMEI backup file and put in your PC as a backup, you can also mail your file to self to make it more secure.
  6. Now whenever you lost your IMEI file from your device or your IMEI gets invalid simply open the same apps and put the file in your android and restore from these apps.
  7. Thats is you are done with backing up and restoring your IMEI number of your device.

So above is all about How To Backup & Restore IMEI in Android. With this you can easily get back your lost IMEI or corrupted IMEI simply from these apps within seconds.

I hope you enjoyed this tutorial , If you have any query regarding this tutorial please mail us or comment us.
Thanks
Keep Visiting Keep Learning.


For Android users we are here with How to Add Background Music to Any App on Your Android. Many of you using android device, a cool smartphone OS that provides lots of features to its users. But the main features come from the cool apps that are specially designed for this OS. And today we will be discussing one of them. while playing any games you listen background sounds there and same thing you can also implement to another apps too. Like chatting on whatsapp with listening background music will be cool. So have a look on complete guide below to add any music in the background play of any android app.

How To Add Background Music To Any App On Android

Here you will be using a cool app that will let you to add music file to the app to play it in the background and you can enjoy that music while working on the app. So follow some simple steps below to proceed.

Steps To Add Add Background Music On Any Android App

  1. First of all you need the app Tasker and this can be get with the seven day free trial from its site from here and also you can purchase it from Google Play store from here.
  2. Now after installing the app in your android go to Settings -> Accessibility -> Tasker and enable the app.
  3. Now go back to app drawer and launch the taskbar app and you will see screen like below.
  4. Now in the profile tab click on plus (+) button there to create a new profile in the app.1
  5. Now you will see lots of option there and you will select application option there as we are adding background music to the apps.2
  6. Now click on the all button to show all the app which you can select to add music to them. Choose the app where you want to add background music.3
  7. Now press back and click on options and select new task to add a new task to the profile that you had created.
  8. Now click on plus button and add new action with any name like bgmusic etc.4
  9. Now click on plus button to add action and there add a new task.
  10. Now there type “Music Play” in the filter box, and select the option that says “Music Play”.5
  11. Now click on next and there in file select the music file that you want to set background music in the app and check the option loop.6
  12. Now after selecting click on back button two times and you will be there in your profile section.7
  13. Now long press options there and select the Exit Action.
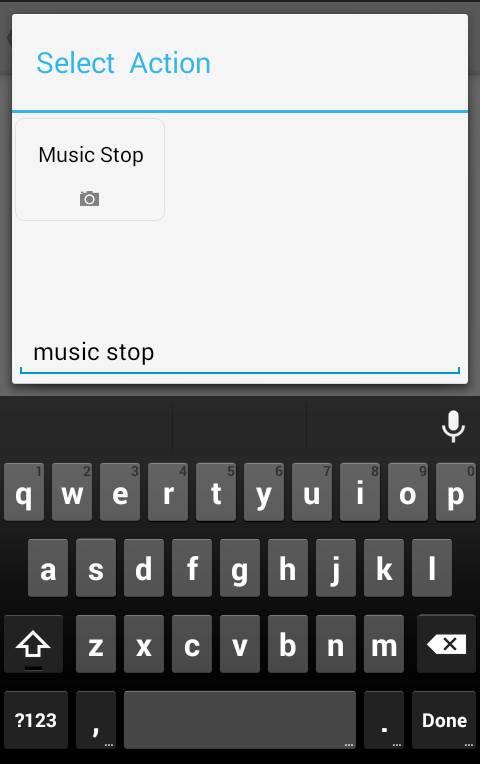
  14. Now there in the filter list type music Stop and select the filtered option appears.8
  15. Now don’t do any changes and press back button two times.
  16. Now long press on the launcher name and select the state now.10
  17. Now select display there, and then select “Display State”.12
  18. Now under IS select on.
  19. Now come back and you will see the options like below in your app.

    13
  20. Thats it you are done, now you have successfully added music in background of your apps.
I hope you enjoyed this tutorial , If you have any query regarding this tutorial please mail us or comment us.
Thanks
Keep Visiting Keep Learning.

Wednesday, 30 September 2015

                                
For android users we are here with How To Schedule Silent Mode In Android. Today we all visits in different places daily where we need to put our android in silent mode, like in school, colleges and office etc. But generally we generally forget to put our android back to general mode and at that time face problems like lost android make harder to find. So here we have a method where you can schedule your silent mode in your android device. You can set time of your meetings or lectures etc where you want to make your android silent. So proceed with the complete guide below to proceed.

How To Schedule Silent Mode In Android

In this method we will be using an app that will put your device on silent mode according to the time set and will put back to the general mode as mentioned in the app before. So proceed with some simple steps discussed below.

Steps To Schedule Silent Mode In Android:

  1. First of all you need to have a cool app Silent Time in your android device that let you to schedule silent mode in your android.
  2. After installing launch the app in your android.
  3. And there click on Add Event there and then set event name, timer and days where you want to make your android on silent mode.scheduling silent mode android 1_result
  4. You can set all the settings to notification and other alerts in it.1
  5. Now click on save and your event will get added to list, similarly you can create multiple events according to your week schedules.2
  6. Thats it you are done, now your android silent will work according to the events that you had save in this app. Enjoy.

So above discussion is all about How To Schedule Silent Mode In Android. With this you can easily automate your android to go to silent mode at fixed time and then back to general mode automatically. And you will not miss out important calls and notification in the android device that you leave in the silent mode.
X